To restore files from File History on Windows 11, open the File History app and select “Restore personal files.” Are you looking to recover files from File History on Windows 11?
File History is a built-in feature that allows you to restore previous versions of files, providing an added layer of security for your data. Whether you accidentally deleted an important document or want to retrieve an earlier version of a file, File History can help you recover your information with ease.
In this guide, we’ll walk you through the steps to restore files from File History on Windows 11, ensuring that you can access your valuable data whenever you need it.

Credit: www.pcworld.com
Setting Up File History
Setting up File History is an essential way to ensure that your important files are backed up and protected from unexpected data loss. By configuring File History on Windows 11, you can easily restore previous versions of your files and folders in the event of accidental deletion or corruption. This step-by-step guide will walk you through the process of setting up File History, from accessing the settings to choosing a backup drive.
Accessing File History Settings
To access File History settings on Windows 11, follow these simple steps:
- Click on the Start button and select Settings.
- In the Settings window, click on System.
- Choose the Storage option from the left-hand menu.
- Scroll down and select the “Advanced storage settings” link.
- Click on the “Backup options” under the More storage settings section.
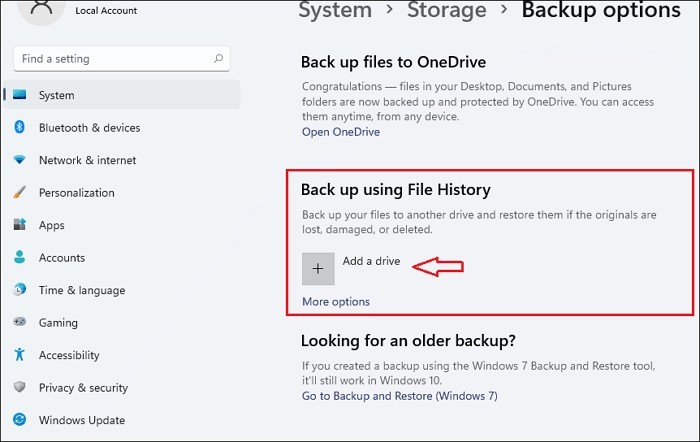
Choosing A Backup Drive
After accessing the File History settings, it’s important to choose a backup drive to store your file history. Here’s how to select a backup drive:
- Connect an external hard drive or select a network location as your backup drive.
- Under the “Back up content from the folder” section, click on the “+” button to add folders you want to back up.
- Once a backup drive is connected and the folders are selected, turn on the “Automatically back up my files” toggle switch to start the backup process.
Restoring Files
In the event of accidental deletion or file corruption, Windows 11 provides a handy feature called File History that allows you to easily restore your files to a previous version. With File History, you can access and select specific files or folders that you’d like to restore, ensuring that you never lose essential data. In this guide, we’ll walk you through the process of accessing File History and restoring files on Windows 11.
Accessing File History
To access File History on Windows 11, follow these simple steps:
- Click on the Start button in the bottom left corner of your screen.
- Go to Settings, represented by the gear icon.
- In the Settings window, select System.
- Scroll down and click on Storage.
- On the Storage page, locate and click on Advanced storage settings.
- Under Advanced storage settings, you will find File History. Click on it to access your saved file versions.
Selecting And Restoring Files
Once you have accessed File History, you can proceed to select and restore the specific files or folders you need:
- In the File History window, you will see a list of all the available file versions.
- Navigate to the desired folder or file by using the timestamp on the left side.
- Select the file or folder you want to restore by clicking on it.
- Click on the Restore button at the bottom of the window.
- Windows will restore the selected file or folder to its original location.
- Alternatively, you can also right-click on the file or folder and choose Restore to to save it to a different location.
With the ease and convenience of File History on Windows 11, you can rest assured that your valuable files are always protected and easily recoverable. By following these simple steps, you can quickly restore any lost or corrupted files, saving you time and unnecessary stress.
Advanced Options
Discover the advanced options available on Windows 11 to effortlessly restore files from your file history. Easily retrieve your important documents and data with just a few simple steps.
Are you looking for advanced options to further customize your File History settings and manage saved versions? Windows 11 provides you with a range of powerful features to ensure that your files are backed up and easily restored when needed. In this section, we will explore two key aspects of advanced options: customizing File History settings and managing saved versions.
Customizing File History Settings
Customizing your File History settings in Windows 11 allows you to personalize how files are backed up and stored. To access these options, follow these simple steps:
- Open the Settings app by pressing the Windows key + I.
- Select the “System” category and then click on “Storage”.
- Scroll down to find the “Advanced storage settings” section and click on “Backup Options”.
- Under the “File History” section, you can now customize a range of settings such as how often the files are backed up, how long they are kept, and which folders are included in the backup.
Taking a moment to personalize these settings ensures that File History fits your specific needs, giving you peace of mind knowing that your important files are always protected.
Managing Saved Versions
Managing saved versions allows you to control how many versions of each file are kept and helps conserve storage space on your device. Here’s how you can manage saved versions using File History on Windows 11:
- Open the Settings app by pressing the Windows key + I.
- Select the “System” category and then click on “Storage”.
- Scroll down to find the “Advanced storage settings” section and click on “Backup Options”.
- Under the “File History” section, click on “Manage backup size”.
- In the “Manage versions” tab, you can specify how many versions of each file you want to keep or set a maximum size for the entire backup.
By managing saved versions, you can optimize your storage usage while still having access to multiple versions of your files whenever you need them.
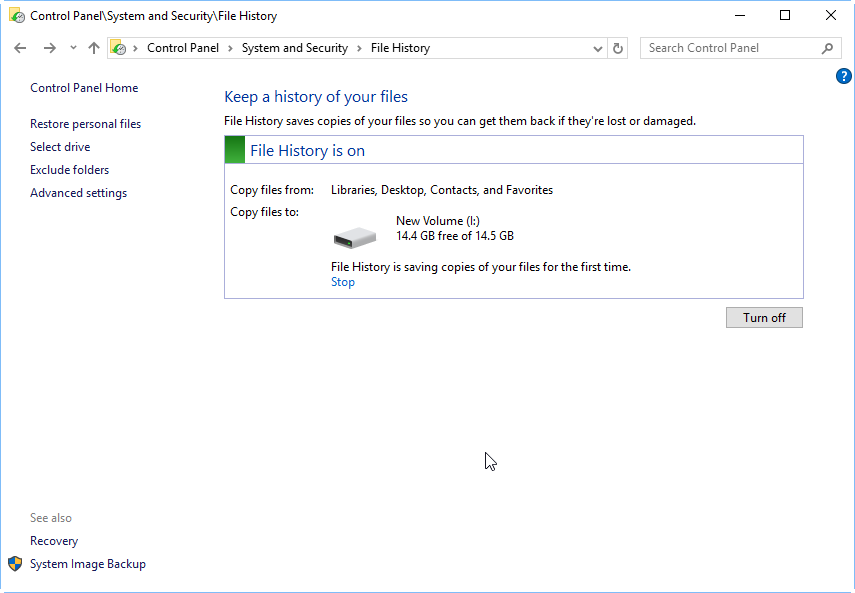
Credit: www.ubackup.com
Best Practices
When it comes to restoring files from File History on Windows 11, following some best practices can help ensure a smooth and successful recovery process. By implementing these practices, you can safeguard your valuable data and minimize the risk of data loss. Let’s explore…
Regular Backups
Regular backups are the foundation of an effective file restoration strategy. It is crucial to establish a routine backup schedule to ensure that your files are consistently protected. By creating a habit of regular backups, you can safeguard against accidental deletions, system failures, or other unforeseen issues.
Monitoring Backup Status
Keeping an eye on the status of your backups is essential to ensure their integrity and completeness. It is recommended to regularly check the backup logs or monitoring tools provided by the File History feature on Windows 11. This practice allows you to identify any backup failures or irregularities promptly, enabling you to take immediate action and rectify any potential issues.
Creating Multiple Backup Copies
While File History on Windows 11 automatically creates backup copies of your files, it is advisable to maintain additional backup copies. Storing backups on different drives, external devices, or cloud storage services adds an extra layer of protection. In case one backup fails or gets damaged, you can rely on the alternative copies to recover your files.
Test Restoration Process
To ensure the effectiveness of your file restoration process, it is crucial to periodically test the restoration procedure. Select a few files from your backup and restore them to a temporary location to verify that they are intact and accessible. This practice will help you identify any potential issues with the restoration process and fix them proactively.
Regularly Update File History Settings
Windows 11 provides various settings and options for File History that cater to your specific backup requirements. It is essential to review and update these settings regularly to ensure they align with your needs. By staying up to date with the settings, you can optimize the backup process and ensure that critical files are being backed up and restored effectively.
Protect Your Backup Storage
Considering the significance of your backup files, it is essential to protect the storage devices where your backups are stored. Utilize appropriate security measures, such as encryption and strong passwords, to prevent unauthorized access or data breaches. Additionally, be mindful of physical safety, keeping backups in a secure location away from potential hazards, like water or fire.
Regularly Review File History Performance
Periodically reviewing the performance of File History is a good practice to ensure its continued effectiveness. Assess the backup speed, storage utilization, and any potential error messages. This evaluation enables you to identify any performance issues, optimize settings, and make informed decisions about your backup strategy.
Summary
Following these best practices can significantly enhance the efficiency and reliability of your file restoration process in Windows 11. Remember to schedule regular backups, monitor backup status, create multiple backup copies, test the restoration process, update File History settings, protect your backup storage, and review File History performance periodically. By incorporating these practices into your backup routine, you can have peace of mind knowing that your files are well-protected and recoverable.
Credit: www.easeus.com
Frequently Asked Questions Of Restore Files From File History On Windows 11
How Do I Restore Files From File History On Windows 11?
To restore files from File History on Windows 11, follow these steps:
1. Open the File History settings by searching for it in the Start menu. 2. Click on “Restore your files with File History.” 3. Browse through the available versions of your files and select the ones you want to restore. 4. Click on the “Restore” button to bring back the selected files to their original location. 5. You can also choose to restore files to a different location if needed.
Can I Restore Files That Have Been Deleted From File History On Windows 11?
Yes, you can restore files that have been deleted from File History on Windows 11. When you open the File History settings, click on “Restore your files with File History” and browse through the available versions of your files. If you don’t see the deleted files, you can try adjusting the time range to include the date when the files were still present.
Once you find the desired version, select the deleted files and click on the “Restore” button.
How Long Does File History Keep Files On Windows 11?
File History can keep files on Windows 11 for as long as you specify in the settings. By default, it keeps files indefinitely until the backup drive becomes full. However, you can customize this duration by going to the File History settings and adjusting the “Keep my backups” setting.
You can choose to keep backups for a specific duration, such as 1 month or 1 year, or until the backup drive is full.
Conclusion
Restoring files from File History on Windows 11 is a convenient and efficient way to recover lost or accidentally deleted data. By following the simple steps outlined in this blog post, you can easily retrieve previous versions of your files and ensure the safety of your important documents.
With File History, you can have peace of mind knowing that your files are protected and easily recoverable when needed. Take advantage of this built-in feature and never worry about losing your files again.