To install VLC and make it the default media player on Windows 11, download VLC from the official website and run the installation file. Then, during the installation process, select the “Set up VLC as the default media player” option.
This will make VLC the default media player on your Windows 11 system. Are you looking to enhance your media playback experience on your Windows 11 computer? Look no further than VLC Media Player. This versatile and user-friendly software offers a wide range of features that cater to all your media needs.
In this guide, we will walk you through the simple steps of installing VLC and setting it as the default media player on your Windows 11 system. Whether you’re a video enthusiast, music lover, or simply seeking a reliable media player, VLC has you covered. So, let’s dive in and optimize your media playback experience with VLC on Windows 11.
Credit: answers.microsoft.com
Why Vlc Is The Ultimate Media Player
Why VLC is the Ultimate Media Player:
VLC Media Player is renowned for its exceptional performance and versatility, making it the go-to choice for millions of users worldwide. From playing various media formats to its feature-rich interface, VLC stands out as the ultimate media player for Windows 11.
Highly Versatile And Compatible
VLC Media Player supports an extensive range of audio and video formats, including MP4, AVI, MKV, and more, ensuring compatibility with virtually any media file you encounter. It eliminates the hassle of searching for additional codecs or players, providing a seamless playback experience for all your media content.
Feature-rich Interface
With a user-friendly interface and a plethora of features, VLC empowers users with customizable options, audio and video effects, and playback controls. Its intuitive design allows for effortless navigation and quick access to essential functions, enhancing the overall media playback experience.
Credit: www.reddit.com
Benefits Of Installing Vlc In Windows 11
When it comes to enhancing your media experience on Windows 11, installing VLC media player is a game-changer. VLC is a versatile, open-source media player that offers a wide range of benefits, making it the preferred choice for millions of users around the world. From seamless video and audio playback to support for various media formats and customizable user experience, VLC has a lot to offer. In this blog post, we will explore the benefits of installing VLC in Windows 11 and how you can make it your default media player for an enhanced multimedia experience.
Seamless Video And Audio Playback
VLC provides seamless playback of both video and audio files, ensuring a smooth and uninterrupted viewing or listening experience. It excels in handling various file types without the need for additional codecs or plugins, making it a reliable choice for playing media content on Windows 11.
Wide Range Of Media Format Support
One of the key advantages of VLC is its extensive support for a wide range of media formats, including popular formats like MP4, AVI, MKV, and more. Whether you’re playing videos, music, or streaming online content, VLC ensures compatibility with diverse file types, eliminating the need for multiple media players.
Customizable User Experience
VLC offers a customizable user experience, allowing you to tweak settings, adjust playback options, and personalize the interface according to your preferences. From creating playlists to customizing the equalizer settings, VLC empowers users to tailor their media playback experience to their liking, enhancing overall satisfaction.
How To Install Vlc In Windows 11
Learn how to install VLC in Windows 11 and set it as the default media player. This step-by-step guide will help you effortlessly enjoy your favorite videos and audio files on the latest Windows operating system.
Windows 11 is the latest operating system by Microsoft, and one of the first things many users like to do after a fresh installation is to set up their preferred media player. VLC media player is a popular choice due to its versatility and wide range of supported file formats. In this guide, we will walk you through the step-by-step process of downloading and installing VLC on Windows 11, ensuring that it becomes your default media player.
Downloading Vlc Setup
Before we can install VLC, we need to download the setup file from the official website. Follow these simple steps:
- Open your preferred web browser.
- Navigate to the official VLC website at videolan.org/vlc/download-windows.
- On the VLC for Windows page, click on the “Download VLC” button.
- The website will automatically detect your operating system as Windows 11.
- Choose the appropriate VLC version (32-bit or 64-bit) based on your system architecture.
- Click on the “Download Now” button to start downloading the setup file.
Wait for the download to complete before moving on to the next step.
Installing Vlc On Windows 11
Now that we have the VLC setup file, we can proceed with the installation process. Follow these steps:
- Navigate to the folder where the VLC setup file was downloaded.
- Double-click on the setup file to start the installation.
- A User Account Control pop-up may appear, asking for permission to make changes to your device. Click “Yes” to proceed.
- The VLC installation wizard will open. Click on the “Next” button to continue.
- Read and accept the license agreement. Click on the “Next” button.
- Choose the installation location for VLC or keep the default location. Click “Next”.
- Choose the additional components you want to install. We recommend selecting all options for a complete VLC experience.
- Click on the “Install” button to start the installation process.
- Wait for the installation to complete. This may take a few moments.
Completing The Installation
You’re almost done! Now, let’s make sure VLC becomes your default media player for Windows 11:
- After the installation is complete, you can launch VLC by clicking on the “Finish” button or the desktop shortcut.
- Once VLC is open, click on the “Media” tab in the menu bar.
- From the dropdown menu, select “Set as default program.”
- A window will open showing the available default programs. Choose VLC and click “OK.”
That’s it! You have successfully installed VLC and made it the default media player on your Windows 11 system. Now you can enjoy your favorite videos and songs with VLC’s powerful features and seamless playback.
Setting Vlc As The Default Player In Windows 11
To set VLC as the default player in Windows 11, first, install the VLC media player from its official website. Then, go to Settings, select Apps, and navigate to Default apps. Under the “Video player” category, choose VLC as the default.
This will ensure that all video files open with VLC by default on your Windows 11 system.
Setting VLC as the default media player on your Windows 11 PC can enhance your multimedia experience and ensure that all your audio and video files open directly in VLC. This step-by-step guide will walk you through the process of accessing the Windows settings, changing default apps, and ultimately setting VLC as your default media player. Let’s get started!
Accessing Windows Settings
To begin the process of setting VLC as your default media player, you’ll first need to navigate to the Windows settings. Here’s how:
- Click on the Start button in the taskbar to open the Start menu.
- Locate and click on the Settings icon, which resembles a gear.
- In the Settings window, select the System option.
- From the left-hand menu, click on Apps.
- In the Apps & features section, click on the Default apps tab.
Changing Default Apps
Once you’ve accessed the Default apps tab in the Windows settings, you can proceed to change the default media player. Follow these steps:
- Scroll down until you find the section labeled Media player.
- Click on the currently selected media player to reveal a list of available options.
- From the list of options, select VLC Media Player.
By changing the default media player to VLC, you ensure that all your audio and video files will open in VLC by default.
Setting Vlc As Default Media Player
Now that you’ve selected VLC as your preferred media player in the Windows settings, you’re one step away from completing the process. Follow these final instructions:
- Close the Settings window.
- Double-click on any audio or video file to test if it opens in VLC.
- If the file successfully opens in VLC, congratulations! You have successfully set VLC as your default media player.
With VLC now set as your default media player in Windows 11, you can enjoy seamless playback of your favorite audio and video files without the need to manually open them in VLC every time. Take advantage of VLC’s extensive features and customization options to enhance your media viewing experience.
Tips And Tricks For Using Vlc As The Default Player In Windows 11
If you are a Windows 11 user, you may find yourself wanting to use VLC as your default media player. VLC is a popular choice among users due to its versatility, wide range of supported formats, and customizable features. In this article, we will explore some tips and tricks to help you make the most out of VLC as your default player in Windows 11. From organizing your media library to customizing preferences and enabling advanced features, we’ve got you covered.
Using Vlc Media Library
A great way to manage your media files with ease is by utilizing the VLC Media Library. This feature allows you to organize your videos, music, and other media into easy-to-navigate categories. To enable the Media Library in VLC:
- Launch VLC player on your Windows 11 system.
- Click on the “View” tab in the top menu bar.
- Select the “Media Library” option from the dropdown menu.
- Once enabled, you can add folders containing your media files to the library by clicking on the “Media” tab and selecting “Open Media“.
- From there, you can navigate to your desired folder and click “Add” to include it in the VLC Media Library.
The VLC Media Library provides a convenient way to browse and play your media files, ensuring a seamless media playback experience.
Customizing Vlc Preferences
VLC offers a range of customizable preferences that allow you to tailor the player to your specific needs. To access and modify these preferences:
- Open VLC player on your Windows 11 system.
- Navigate to the “Tools” tab in the top menu bar.
- Select “Preferences” from the dropdown menu.
- In the Preferences window, you can explore various categories such as “Interface“, “Video“, “Audio“, and more.
- Click on a category to expand and access specific settings.
- Customize preferences according to your preferences, such as adjusting video and audio output, aspect ratios, subtitle settings, and more.
- Remember to click “Save” or “Apply” after modifying your preferences to ensure the changes take effect.
By customizing VLC preferences, you can enhance your viewing and listening experience by enabling features that suit your individual preferences.
Enabling Advanced Features
VLC offers a plethora of advanced features that can further amplify your media playback experience. To enable these advanced features:
- Launch VLC player on your Windows 11 system.
- Go to the “Tools” tab in the top menu bar.
- Select “Preferences” from the dropdown menu.
- In the Preferences window, select “Show All” at the bottom left corner to display advanced options.
- Explore the various advanced settings available, such as video filters, audio effects, network caching, and more.
- Enable or disable the advanced features according to your preference by selecting or deselecting the respective checkboxes.
- Once you have made your desired changes, click “Save” or “Apply” to finalize the settings.
By unlocking these advanced features in VLC, you can fully utilize the player’s capabilities and enhance your media playback experience to the fullest.

Credit: www.reddit.com
Frequently Asked Questions For Install Vlc And Make It Default On Windows 11
How Do I Install Vlc On Windows 11?
To install VLC on Windows 11, you can visit the official VideoLAN website and download the latest version of VLC for Windows. Once the download is complete, run the installer and follow the on-screen instructions to complete the installation process.
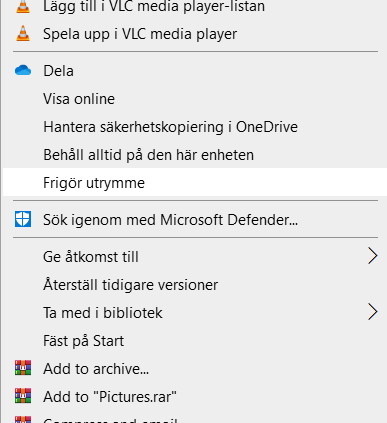
How Can I Make Vlc The Default Media Player On Windows 11?
To make VLC the default media player on Windows 11, follow these steps:
1. Right-click on any media file. 2. Select “Open with” and choose “Choose another app.” 3. Find and select VLC from the list of apps. 4. Check the box that says “Always use this app to open . [file extension] files.” 5. Click “OK” to set VLC as the default media player for the selected file type.
Can I Customize Vlc Media Player On Windows 11?
Yes, you can customize VLC media player on Windows 11 to suit your preferences. VLC offers various customization options, including changing the interface theme, adding or removing toolbar buttons, modifying keyboard shortcuts, and adjusting audio and video settings. Simply navigate to the settings menu in VLC to access these customization options.
How Do I Update Vlc On Windows 11?
To update VLC on Windows 11, open the VLC media player and go to the Help menu. Then, click on “Check for Updates. ” If a new version is available, follow the prompts to download and install the latest update.
Alternatively, you can visit the official VideoLAN website and download the latest version manually.
Conclusion
To wrap up, installing VLC as the default media player on Windows 11 offers a seamless and feature-rich experience. With its user-friendly interface and extensive format support, VLC is the go-to choice for playing various media files effortlessly. By following the simple steps mentioned in this blog post, you can make VLC your default player, enhancing your media playback experience on Windows 11.
Say goodbye to compatibility issues and enjoy your digital content hassle-free. Happy multimedia streaming!