If you can’t boot Windows 11 after enabling Hyper-V, you may need to disable it. Enabling Hyper-V on Windows 11 may cause compatibility issues with certain hardware configurations, resulting in boot failure.
To resolve this issue, you can boot into Safe Mode and disable Hyper-V from the Windows Features menu. Alternatively, you can use the command prompt to disable Hyper-V. Ensure that your hardware meets the requirements for running Hyper-V and that any necessary updates and drivers are installed.
By following these steps, you should be able to resolve the boot issue and use Windows 11 without encountering Hyper-V-related problems.
Check System Requirements
When encountering issues with booting Windows 11 after enabling Hyper-V, it’s crucial to first check the system requirements to ensure that your hardware meets the necessary specifications. This can help troubleshoot any compatibility issues that may be preventing the operating system from booting properly.
Processor Compatibility
Ensure that your processor is compatible with Hyper-V virtualization. Windows 11 requires a 64-bit processor with at least 1 GHz clock speed and 2 or more cores. Check your processor’s specifications to confirm compatibility with Hyper-V.
Memory Requirements
Verify that your system has sufficient memory to support Hyper-V and Windows 11. The minimum RAM requirement for Windows 11 is 4 GB, but for optimal performance with virtualization, it’s recommended to have at least 8 GB of RAM. Ensure that your system meets the memory requirements for both Windows 11 and Hyper-V.

Credit: github.com
Disable Hyper-v
Disabling Hyper-V is a crucial step when facing issues with booting Windows 11 after enabling Hyper-V. This action allows you to resolve any conflicts and ensure a smooth boot process for your operating system.
Using Command Prompt
If you prefer using the Command Prompt, follow these short steps to disable Hyper-V:
- Open the Command Prompt as an administrator.
- Type
bcdedit /set hypervisorlaunchtype offand press Enter. - Restart your computer to apply the changes.
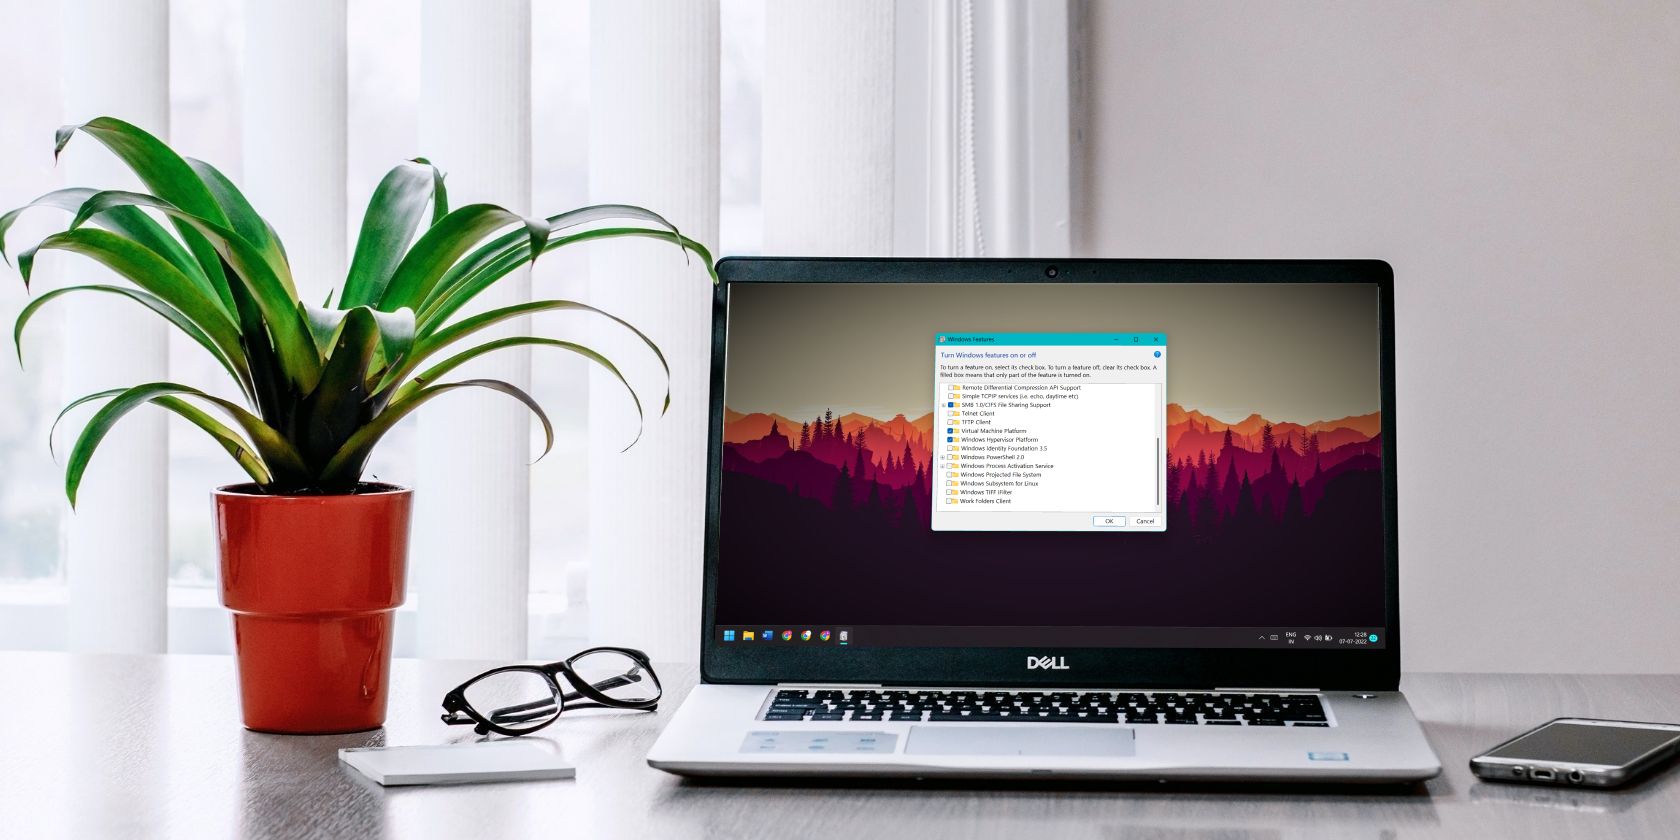
Using Windows Features
If you prefer utilizing Windows Features, the following steps will guide you through disabling Hyper-V:
- Open the Control Panel and click on “Programs”.
- Choose “Turn Windows features on or off”.
- Locate Hyper-V and uncheck it, then click “OK”.
- Restart your computer to finalize the process.
Update Drivers
After enabling Hyper-V on your Windows 11, you may encounter issues with booting. To resolve this, update your drivers to ensure compatibility and smooth operation.
Graphics Driver
One common issue faced by Windows 11 users after enabling Hyper-V is being unable to boot their system. This can be quite frustrating, but don’t worry, there’s a simple solution – updating your drivers. In this blog post, we’ll guide you through the process of updating your graphics driver and chipset driver to resolve the booting problem.
When it comes to boot issues caused by enabling Hyper-V, the graphics driver is often the culprit. An outdated or incompatible graphics driver can prevent your system from starting up properly. Updating the graphics driver is a crucial step to ensure a smooth booting process.
To update your graphics driver, follow these simple steps:
- Open the Device Manager by pressing the Windows key + X and selecting “Device Manager” from the menu.
- In the Device Manager window, expand the “Display adapters” category.
- Right-click on your graphics driver and select “Update driver”.
- Choose the option to automatically search for updated driver software.
- If a new graphics driver is found, follow the on-screen instructions to install it.
- Restart your system to apply the changes.
Updating your graphics driver can help resolve any compatibility issues between Hyper-V and your system, allowing you to boot Windows 11 without any hindrance.
Chipset Driver
Another driver that plays a significant role in the boot process is the chipset driver. An outdated or incompatible chipset driver can also cause booting problems after enabling Hyper-V. Therefore, updating this driver is essential for a successful boot.
To update your chipset driver, follow these steps:
- Open the Device Manager by pressing the Windows key + X and selecting “Device Manager” from the menu.
- In the Device Manager window, expand the “System devices” category.
- Look for the chipset driver or any related driver with the term “chipset” in its name.
- Right-click on the chipset driver and select “Update driver”.
- Choose the option to automatically search for updated driver software.
- If a new chipset driver is found, follow the on-screen instructions to install it.
- Restart your system to apply the changes.
Updating the chipset driver is crucial to ensure compatibility between Hyper-V and your system, allowing you to boot Windows 11 smoothly.
Credit: www.makeuseof.com
Verify Virtualization Settings
One common issue that users may face when enabling Hyper-V on Windows 11 is the inability to boot their system. This can be frustrating and may leave you wondering what went wrong. In this section, we will focus on verifying the virtualization settings, specifically exploring the BIOS settings and Windows features.
Bios Settings
Before diving into the software aspect, it’s crucial to ensure that your BIOS settings are properly configured. Accessing the BIOS settings may vary depending on your computer manufacturer, but it usually involves pressing a specific key during system startup, such as F2 or Del. Once you’re in the BIOS, look for options related to virtualization.
Typically, these options are found in the “Advanced” or “CPU Configuration” section. Look for keywords like “Virtualization Technology (VT-x)” or “AMD-V”. Ensure that these options are enabled. If they are already enabled, try disabling them and then enabling them again. Sometimes, a simple reset can resolve any conflicts or inconsistencies.
Windows Features
After checking and adjusting the BIOS settings, it’s time to address the Windows features related to virtualization. Windows features play a vital role in enabling and managing Hyper-V. To access the Windows features settings:
- Open the Start menu and search for “Turn Windows features on or off”.
- Click on the corresponding search result to open the “Windows Features” window.
In the “Windows Features” window, locate the “Hyper-V” option. You can expand it to reveal its sub-features. Ensure that all relevant features are checked. If they are already checked, try unchecking them and then checking them again. This action can refresh the settings and potentially resolve any issues.
Once you have verified and adjusted both the BIOS settings and Windows features, save any changes made and restart your computer. By going through these steps, you have effectively confirmed that the virtualization settings are properly configured and optimized for Hyper-V on Windows 11.
Restore System
Restoring your system is a crucial step when encountering issues with booting Windows 11 after enabling Hyper-V. Fortunately, there are two effective methods that can help resolve this problem: using a system restore point or performing a clean installation. In this article, we will guide you through these methods, allowing you to regain access to your Windows 11 operating system.
Using System Restore Point
If you have previously created a system restore point, you can utilize this feature to revert your system back to a working state. Here’s how:
- First, boot your computer into the Windows Recovery Environment by restarting your PC and pressing the F11 key repeatedly while it’s starting up.
- Once in the Recovery Environment, select “Troubleshoot” and then “Advanced options.”
- Next, click on “System Restore” and select a restore point that was created before enabling Hyper-V.
- Follow the on-screen instructions to complete the system restore process.
- Once the restore is complete, restart your computer and check if the issue has been resolved.
Performing Clean Installation
If the system restore option is not available or doesn’t fix the problem, performing a clean installation of Windows 11 can be a reliable solution. However, keep in mind that this process will erase all the data on your computer. Be sure to back up important files before proceeding. Follow these steps to perform a clean installation:
- Download the Windows 11 installation media from the official Microsoft website and create a bootable USB drive.
- Insert the bootable USB drive into your computer and restart it.
- During the startup process, press a key (usually Esc, F2, or F12) to access the boot menu.
- From the boot menu, select the USB drive as the boot device.
- Follow the on-screen instructions to install Windows 11, selecting the “Custom” installation option.
- When prompted, choose the drive where you want to install Windows 11 and proceed with the installation.
- After the installation is complete, restart your computer and check if the booting issue is resolved.
By following either the system restore or clean installation method, you should be able to restore your system and successfully boot into Windows 11 after enabling Hyper-V. Remember to exercise caution and carefully follow the instructions to ensure a smooth recovery process.

Credit: github.com
Frequently Asked Questions On Cant Boot Windows 11 After Enabling Hyper V
Why Won’t My Windows 11 Boot After Enabling Hyper-v?
Enabling Hyper-V may result in compatibility issues with certain hardware configurations, causing Windows 11 to fail to boot. This issue can be resolved by disabling Hyper-V, updating device drivers, or checking for any conflicting software that is preventing the boot process.
Conclusion
To wrap up, if you’re experiencing issues with booting Windows 11 after enabling Hyper-V, there are a few troubleshooting steps you can take. First, ensure you meet the system requirements and have the latest updates installed. Next, check the BIOS settings and make sure virtualization technology is enabled.
Additionally, try disabling any conflicting software or drivers. If all else fails, consider reaching out to Microsoft support for further assistance. By following these steps, you should be able to resolve the problem and get your Windows 11 up and running smoothly again.