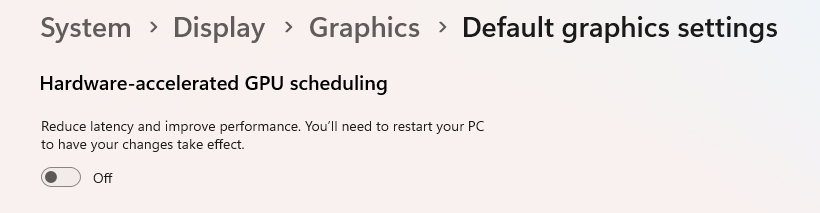
To enable hardware accelerated GPU scheduling, go to Settings > System > Display, then click on Graphics Settings and turn on “Hardware-accelerated GPU scheduling”. This feature can improve GPU latency and overall performance.
Enter the world of enhanced graphics performance by enabling hardware-accelerated GPU scheduling within your Windows system. This advanced feature allows you to optimize GPU performance and reduce latency, resulting in smoother visuals and improved overall system responsiveness. By following a few simple steps, you can unlock the potential of your GPU and experience a seamless and immersive computing experience.
Whether you’re a gamer, content creator, or simply want to maximize your system’s capabilities, enabling hardware-accelerated GPU scheduling can take your graphics performance to the next level. Let’s dive into the process of activating this cutting-edge feature and unleash the full power of your GPU.
Credit: m.majorgeeks.com
Benefits Of Hardware Accelerated Gpu Scheduling
Hardware Accelerated GPU Scheduling (HAGS) is a groundbreaking feature that offers a host of benefits for users. By efficiently managing and offloading tasks to the GPU, HAGS enhances the overall performance and user experience across a wide range of applications. Let’s explore some of the key benefits of enabling Hardware Accelerated GPU Scheduling:
Improved Gaming Performance
Enabling HAGS can lead to significant improvements in gaming performance. By allowing the GPU to more efficiently schedule its tasks, HAGS reduces latency and enhances frame rates, resulting in smoother gameplay and an overall more immersive gaming experience.
Enhanced Multimedia Playback
With Hardware Accelerated GPU Scheduling, multimedia content playback is optimized. Whether you’re streaming high-resolution videos or editing graphics-intensive media, HAGS ensures smooth, stutter-free playback and accelerated rendering, delivering a more satisfying multimedia experience.
Efficient Multitasking
Enabling HAGS enables more efficient multitasking, allowing users to seamlessly run multiple graphics-intensive applications simultaneously. By offloading tasks to the GPU and optimizing resource allocation, HAGS ensures that each application receives the necessary resources, resulting in improved overall system responsiveness and performance.
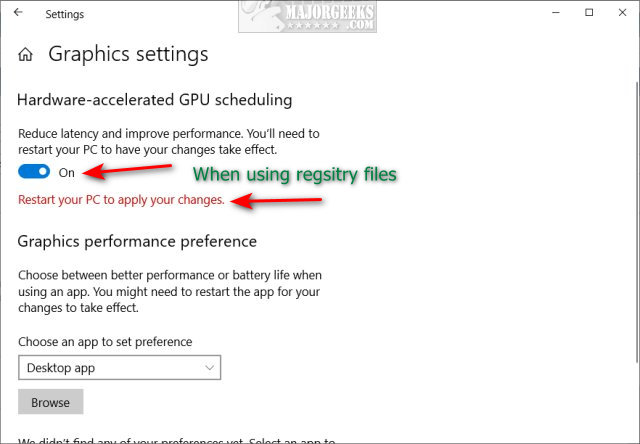
Credit: www.pugetsystems.com
How To Enable Hardware Accelerated Gpu Scheduling
Hardware accelerated GPU scheduling can significantly improve the performance of your graphics processing unit (GPU) by allowing it to manage its own memory. Enabling this feature can result in smoother graphics, reduced input latency, and overall better gaming or visual experience. However, before you can benefit from this enhancement, you need to ensure that your GPU is compatible, update its drivers, and enable the GPU scheduling feature. In this guide, we’ll walk you through the steps to enable hardware accelerated GPU scheduling on your system.
Check Gpu Compatibility
Before proceeding, make sure that your GPU supports hardware accelerated GPU scheduling. Check the official website of your GPU manufacturer for compatibility information. Most modern GPUs from manufacturers like NVIDIA and AMD support this feature. For a quick check, you can also refer to the list of supported GPUs on the Microsoft website.
Update Gpu Drivers
Ensure that you have the latest GPU drivers installed on your system. Visit the official website of your GPU manufacturer to download and install the most recent drivers. Updated drivers often include support for new features such as hardware accelerated GPU scheduling, and they can also improve overall stability and performance of your GPU.
Enable Gpu Scheduling
- Right-click on your desktop and select “Display settings”.
- Scroll down and click on “Graphics settings”.
- Under “Graphics settings”, switch on “Hardware-accelerated GPU scheduling”.
- Restart your system to apply the changes.
Optimizing Performance With Hardware Accelerated Gpu Scheduling
One of the key factors in achieving optimal performance on your computer is utilizing hardware acceleration technologies. With the introduction of Windows 10 May 2020 Update, Microsoft introduced a new feature called Hardware Accelerated GPU Scheduling. By enabling this feature, you can take advantage of improved graphics performance and reduce latency, resulting in a smoother and more responsive experience overall.
Adjusting Gpu Settings
Enabling Hardware Accelerated GPU Scheduling is a straightforward process. Here’s how:
- Right-click on your desktop and select “Display settings”.
- Scroll down and click on “Graphics settings”.
- In the “Graphics performance preference” section, click on the “Hardware-accelerated GPU scheduling” toggle to turn it on.
- Restart your computer to apply the changes.
Monitoring Gpu Performance
After enabling Hardware Accelerated GPU Scheduling, it’s important to monitor your GPU performance to ensure it’s working optimally. Here are a few tools you can use:
- Task Manager: Open Task Manager by pressing Ctrl+Shift+Esc, click on the “Performance” tab, and select “GPU” in the left-hand menu. You can view GPU utilization, memory usage, and other metrics in real-time.
- GPU-Z: This tool provides detailed information about your GPU, including clocks, temperatures, and driver versions. You can download GPU-Z for free from the official website.
- MSI Afterburner: Ideal for more advanced users, MSI Afterburner allows you to overclock your GPU and monitor various performance metrics, including temperature, fan speed, and voltage.
Troubleshooting Common Issues
If you encounter any issues after enabling Hardware Accelerated GPU Scheduling, here are a few troubleshooting steps you can take:
- Update Your GPU Drivers: Visit the official website of your GPU manufacturer and download the latest drivers compatible with your hardware.
- Disable Third-Party Overclocking Tools: Some third-party overclocking software can conflict with Hardware Accelerated GPU Scheduling. Disable them temporarily to see if it resolves the issue.
- Reset GPU Settings: Use your GPU control panel to restore default settings and check if the issue persists.
In summary, enabling Hardware Accelerated GPU Scheduling is a simple yet effective technique to optimize performance on your computer. By adjusting GPU settings, monitoring performance, and troubleshooting any issues that may arise, you can ensure a seamless and efficient experience while enjoying graphics-intensive applications and games.
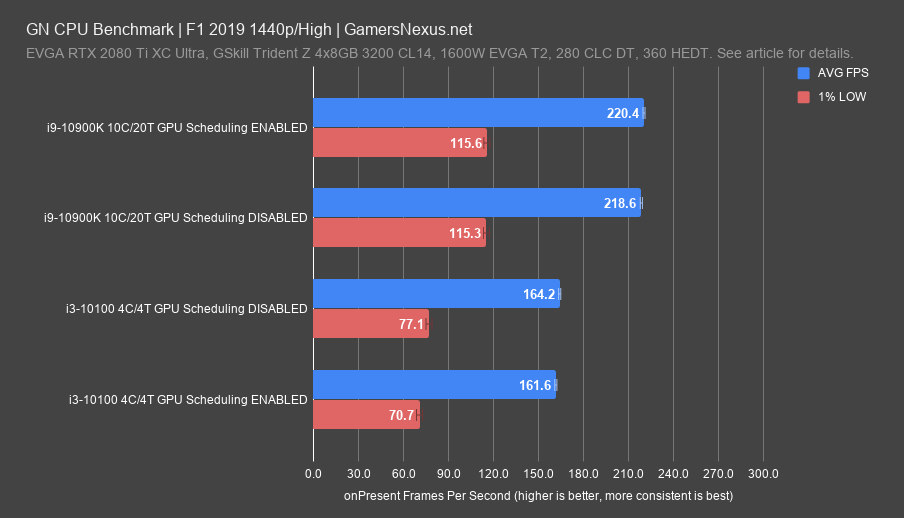
Credit: gamersnexus.net
Frequently Asked Questions For How To Enable Hardware Accelerated Gpu Scheduling
How Can I Enable Hardware-accelerated Gpu Scheduling On My Computer?
To enable hardware-accelerated GPU scheduling on your computer, go to the Windows Settings menu, click on System, then Display. From there, click on Graphics Settings and enable the “Hardware-accelerated GPU scheduling” option. This setting allows your GPU to manage its own memory, resulting in improved performance and smoother graphics.
What Are The Benefits Of Enabling Hardware-accelerated Gpu Scheduling?
Enabling hardware-accelerated GPU scheduling provides several benefits. It allows your GPU to manage its own memory, reducing latency and improving overall performance. This results in smoother and more responsive graphics, particularly during graphically intensive tasks such as gaming or video editing.
It can also potentially improve the performance of applications that utilize GPU acceleration.
Does My Computer Support Hardware-accelerated Gpu Scheduling?
Not all computers support hardware-accelerated GPU scheduling. To check if your computer supports this feature, go to the Windows Settings menu, click on System, then Display. From there, click on Graphics Settings and check if the “Hardware-accelerated GPU scheduling” option is available.
If it is, your computer supports this feature and you can enable it for better graphics performance.
Conclusion
Enabling hardware accelerated GPU scheduling can greatly enhance the performance and efficiency of your computer’s graphics processing. By offloading certain tasks to the GPU, this feature allows for smoother and faster performance in visually demanding applications and games. With the step-by-step guide provided in this blog post, you can easily enable hardware accelerated GPU scheduling on your Windows 10 system and experience the benefits first-hand.
Boost your graphics performance today!